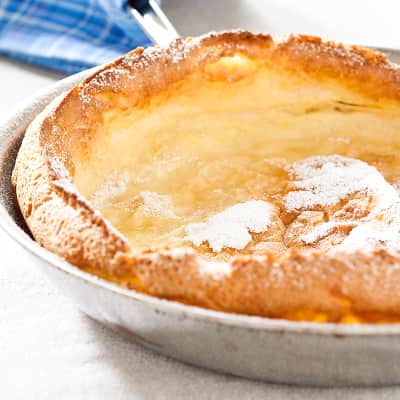
America's Test Kitchen LogoCook's Country LogoCook's Illustrated LogoAmerica's Test Kitchen LogoCook's Country LogoCook's Illustrated Logo

Perfect Popovers

By America's Test Kitchen

Published on August 3, 2012

Time

1½ hours, plus 1 hour resting

Yield

Makes 6 popovers

Perfect Popovers

Ingredients

Vegetable shortening (see note)3 large eggs 2 cups low-fat milk, heated to 110 degrees3 tablespoons unsalted butter, melted and cooled slightly2 cups (11 ounces/312 grams) bread flour (see note)1 teaspoon salt 1 teaspoon sugar

Before You Begin

Greasing the pans with shortening ensures the best release, but cooking spray may be substituted; do not use butter. To gauge the popovers’ progress without opening the oven door, use the oven light during baking. Bread flour makes for the highest and sturdiest popovers, but an equal amount of all-purpose flour may be substituted.

Instructions

  1. Adjust oven rack to lower-middle position and heat oven to 450 degrees. Grease interior of 6-cup popover pan with shortening, then dust lightly with flour. Whisk eggs until light and foamy in medium bowl. Slowly whisk in milk and butter until incorporated.
  2. Combine flour, salt, and sugar in large bowl. Whisk three-quarters of milk mixture into flour mixture until no lumps remain, then whisk in remaining milk mixture. Transfer batter to large measuring cup, cover with plastic, and let rest at room temperature for 1 hour. (Alternatively, batter can be refrigerated for 1 day. Bring to room temperature before proceeding with recipe.)
  3. Whisk batter to recombine, then pour into prepared popover pan (batter will not quite reach top of cups). Bake until just beginning to brown, about 20 minutes. Without opening oven door, decrease oven temperature to 300 degrees and continue to bake until popovers are golden brown all over, 35 to 40 minutes longer. Poke small hole in top of each popover with skewer and continue to bake until deep golden brown, about 10 minutes longer. Transfer popover pan to wire rack. Poke again with skewer and let cool 2 minutes. Turn out popovers. Serve.
  4. Make Ahead: Once popovers have cooled completely, they can be stored at room temperature in zipper-lock bag for 2 days. To serve, adjust oven rack to middle position and heat oven to 400 degrees. Heat popovers on rimmed baking sheet until crisp and heated through, 5 to 8 minutes.

Perfect Popovers

Headshot of America's Test Kitchen
By America's Test Kitchen
Save

Time

1½ hours, plus 1 hour resting

Yield

Makes 6 popovers

Ingredients

Vegetable shortening (see note)
3 large eggs
2 cups low-fat milk, heated to 110 degrees
3 tablespoons unsalted butter, melted and cooled slightly
2 cups (11 ounces/312 grams) bread flour (see note)
1 teaspoon salt
1 teaspoon sugar

Test Kitchen Techniques

Ingredients

Vegetable shortening (see note)
3 large eggs
2 cups low-fat milk, heated to 110 degrees
3 tablespoons unsalted butter, melted and cooled slightly
2 cups (11 ounces/312 grams) bread flour (see note)
1 teaspoon salt
1 teaspoon sugar

Test Kitchen Techniques

Ingredients

Vegetable shortening (see note)
3 large eggs
2 cups low-fat milk, heated to 110 degrees
3 tablespoons unsalted butter, melted and cooled slightly
2 cups (11 ounces/312 grams) bread flour (see note)
1 teaspoon salt
1 teaspoon sugar

Test Kitchen Techniques

Why This Recipe Works

We chose bread flour for its high protein content, which gave our Perfect Popovers the highest rise and crispest crust. Resting the batter for an hour before baking gave the proteins in the flour time to relax and prevented the popovers from setting up too quickly. We used low-fat milk instead of whole milk for a higher-rising, moist product. Heating the milk allowed the batter to come together with less mixing, which was key to avoiding an overworked batter and tough popovers.

We had the best results baking the popovers first at high heat to initiate the rise, then turning the oven down so the interiors would be done at the same time as the crust. To prevent the popovers from collapsing as they cooled, we poked a hole in the top of each one when they were almost done cooking, and then again as they cooled. This allowed the steam to escape and kept the crisp structure intact.

Before You Begin

Greasing the pans with shortening ensures the best release, but cooking spray may be substituted; do not use butter. To gauge the popovers’ progress without opening the oven door, use the oven light during baking. Bread flour makes for the highest and sturdiest popovers, but an equal amount of all-purpose flour may be substituted.

Instructions

  1. Adjust oven rack to lower-middle position and heat oven to 450 degrees. Grease interior of 6-cup popover pan with shortening, then dust lightly with flour. Whisk eggs until light and foamy in medium bowl. Slowly whisk in milk and butter until incorporated.
  2. Combine flour, salt, and sugar in large bowl. Whisk three-quarters of milk mixture into flour mixture until no lumps remain, then whisk in remaining milk mixture. Transfer batter to large measuring cup, cover with plastic, and let rest at room temperature for 1 hour. (Alternatively, batter can be refrigerated for 1 day. Bring to room temperature before proceeding with recipe.)
  3. Whisk batter to recombine, then pour into prepared popover pan (batter will not quite reach top of cups). Bake until just beginning to brown, about 20 minutes. Without opening oven door, decrease oven temperature to 300 degrees and continue to bake until popovers are golden brown all over, 35 to 40 minutes longer. Poke small hole in top of each popover with skewer and continue to bake until deep golden brown, about 10 minutes longer. Transfer popover pan to wire rack. Poke again with skewer and let cool 2 minutes. Turn out popovers. Serve.
  4. Make Ahead: Once popovers have cooled completely, they can be stored at room temperature in zipper-lock bag for 2 days. To serve, adjust oven rack to middle position and heat oven to 400 degrees. Heat popovers on rimmed baking sheet until crisp and heated through, 5 to 8 minutes.

Gift This Recipe

Enjoyed this dish? Let others know by sharing it as a gift recipe.

This is a members' feature.