
 Buy at Amazon
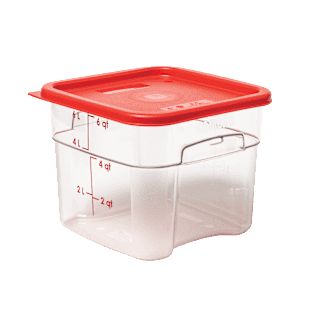
We rely on dry storage containers to keep our pantry ingredients fresh and organized. Our favorite, the Cambro CamSquares Classic 6-Qt. Translucent Food Storage Container, is a mainstay of professional kitchens. This simple container seals tightly to protect dry goods and is easy to use and clean. We were also impressed with the Progressive ProKeeper+ 4-Qt. Flour Storage Container, a rectangular container designed for home use. It’s a good option for people who plan to keep their dry goods on their countertop and want a more attractive storage set.

We use dry storage containers for pantry ingredients such as flour, sugar, oats, pasta, rice, lentils, and other grains. These containers are more durable and seal more tightly than the bags or boxes these items come in, offering better protection from humidity and pests. They’re often sold in a variety of sizes, so you can assemble a set of matching containers that fit your needs.
Most of those containers are made of plastic. Much like how it is with plastic food storage containers used to transport lunch or store leftovers, different types of plastic are used to manufacture these sets. Polycarbonate previously was the most widely used type, in large part because it’s transparent and people can easily see inside containers made from it. Polycarbonate has become less common due to concerns that the bisphenol A (BPA) it contains can cause disruptions in hormonal activity if the plastic degrades. Plastic is more likely to degrade when exposed to heat, fat, and acids, and dry storage containers tend to be used in the pantry (away from bright light) and at room temperature (away from heat) with ingredients that are neither fatty nor acidic. Some companies—including Cambro, maker of containers that are ubiquitous in the restaurant industry—continue to produce and sell polycarbonate containers. (Note that we recommend washing all plastic containers by hand to avoid exposure to the long, hot wash and dry cycles in the dishwasher.) However, some manufacturers have switched to BPA-free plastics. The most common of these are polypropylene, which is translucent, and a clear-as-glass plastic sold under the brand name Tritan.

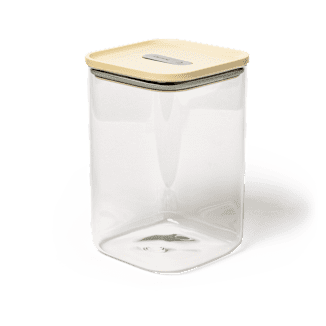
As with other categories of kitchen equipment, we’ve seen growing interest in glass options. We were intrigued by glass, which seemed to offer good looks—an important consideration in kitchens where the containers are visible—and doesn’t have the potential health concerns of some types of plastic. Options are currently limited and fairly expensive, but we found two sets to test. We imagine that this category will continue to grow over time.
What Size Dry Storage Containers Do You Need?
We focused our testing on 6-quart containers or, if a manufacturer didn’t offer that size, the closest available option. We knew from previous testing that 6-quart containers can comfortably fit a standard 5-pound bag of flour—an essential in most kitchens—and to dip in a measuring cup and level it off without spilling.

We suggest assembling a set of dry storage containers based on your specific pantry staples. Here are our recommendations for which size container to use for some common ingredients:
- 6-quart: 5-lb bags of flour or rice
- 3-quart: 4-lb bag of sugar
- 2-quart: 2-lb bag of rice or brown sugar, 2.6-lb package of oats
- 1-quart: 1-lb bag of rice or brown sugar, 24-oz box of cereal
What to Look for
- A Tight Seal: Humid air can ruin dry goods quickly. To find out which containers were most effective at keeping moisture at bay, we set up a closet with a humidifier running at 100 percent and performed a pair of tests—first when the containers were brand-new, and then again after they had gone through testing and had been opened and closed repeatedly. We added equal amounts of blue desiccant pebbles, which change color when exposed to humidity, to each container and then sealed them tight before placing them in the humid closet. We also included one open, lidless container as a control sample. Some containers’ desiccant pebbles remained sapphire blue, indicating that their lids kept out moisture and would provide a tightly sealed environment for dry goods. Pebbles in other containers started to fade, turning various shades of light purple to pink-ish purple, indicating that these containers were less tightly sealed. Interestingly, the style of lid didn’t correspond to how well it sealed: Some containers had lids that you simply pressed onto the container, while others latched or twisted closed. But even some simple press-down lids without any special latches or gaskets sealed tightly.

- A Wide Opening: It’s easy to pour 5-pound bags of flour or big bags of sugar into containers with broad openings without spilling. Wide openings are helpful when using the containers too. We often dip dry measuring cups into storage containers and level them off with a knife (though many say that the most accurate way to measure dry ingredients without a digital scale is to spoon the flour into the measuring cup and then level). We found that openings measuring at least 8 inches wide gave our measuring cup enough clearance on both sides, so excess flour we swept off didn’t make a dusty mess on the counter.
- Short Walls: To comfortably scoop ingredients without having to reach deep into a container, we liked short models with walls of 8.5 inches or less. One model was about 13 inches tall, so we were up to our elbows when we reached into the bottom of it to scoop flour.

- Clear Markings: Containers with measurement markings on the walls allowed us to tell at a glance how much flour, sugar, or oats we had on hand.

What to Avoid
- A Narrow Opening: A few containers we tested had narrow openings that were only about 4 inches across. Filling containers with such a tight opening was messy. Despite our best efforts to work slowly and carefully, flour flew sideways and landed on the counter, wasting it and making a mess that we had to clean up. Narrow openings also made it harder to scoop out ingredients.


Containers with a wide opening allowed us to “dip and sweep” without making a mess.
- Narrow Containers: It felt cramped and awkward to access the lower portion of narrow containers. Some had big indentations that further narrowed the available space, making it very challenging to scoop out ingredients with a measuring cup.
Other Considerations
- Maneuverability: Almost all of the plastic containers had indentations that acted like handles, allowing you to lift and carry them more easily. The plastic models were also fairly light. None of the glass containers had handles and we found the glass to be a little more slippery. They also weighed about 1 pound more than the plastic models, a difference that felt very noticeable when the containers were filled with 5 pounds of flour. That said, we don’t consider these issues to be deal-breakers for someone who really wants to avoid plastic.
- Place color-changing desiccant pebbles inside sealed container, then store in a high-humidity environment for five days, checking for signs of moisture
- Fill with 5-pound bag of flour
- Using 1-cup dry measuring cup, transfer contents into mixing bowl until empty
- For plastic: Fill with a 5-pound bag of flour, close tightly, then drop onto floor from a height of about 2 feet
- For glass: Fill with a 5-pound bag of flour, close tightly, then gently knock over onto the counter
- Open and close lid 100 times
- Wash and dry each container 10 times by hand
- Repeat test with color-changing desiccant pebbles at conclusion of other evaluations
How We Rated
- Performance: We evaluated whether the containers sealed tightly and kept out humidity.
- Ease of Use: We rated how easy it was to dispense ingredients. We also assessed how easily each container could be lifted and moved around a kitchen.
- Cleanup: We noted how easy it was to clean and dry each container.